A modern-day chef will confer that having a thermometer installed on any grill, charcoal, or gas grill is perfecting the grilling art. You will appreciate that a thermometer aids in setting the right temperature for the food being grilled thus bringing out the best results.
We have noticed that modern grills come handy with a smoker thermometer already installed. However, you can install one using the following simple steps.
Tools Needed for Installation of a Thermometer
To achieve smooth and precise installation of a thermometer on your grill, you must assemble these tools. These tools will facilitate the entire process and ensure your grill is left in good shape after installation. Remember to be precise so as not to alter the functionality of the grill. The tools we recommend you bear in your possession for the installation are as follows:
- Drill – the purpose of a drill is to allow you to create a space/ hole where the thermometer will seat on your grill. The drill you sort for installation needs to have the capacity to drill through metallic products.
- Tape Measure – Take the measurements for the thermometer size. These measurements are then transferred to the grill when drilling the space to install the thermometer. Precision is paramount to ensure you retain form, shape, and functionality of the grill.
- Nail – it is important that you guide the punch through your grill. The nail will facilitate this process and give you a perfect punch through the grill for proper thermometer installation.
- Hammer – the hammer will play the role of guiding the nail as you get a punch onto the grill.
Steps in Installing a Thermometer On a Grill
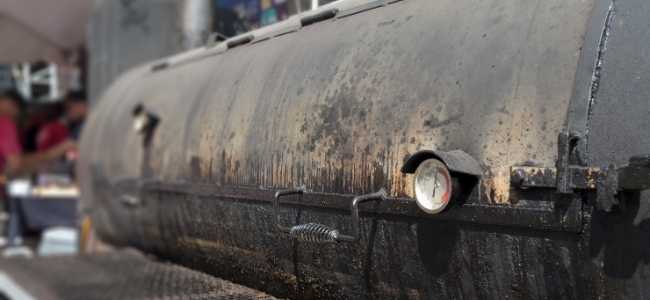
The best spot to install your smoker thermometer on your grill is the hood of your cooker. As mentioned earlier, precision is paramount when drilling the hood to create installation space. We suggest you follow these elaborate steps when installing your thermometer on your grill for efficiency and precision. The entire process is easy with minimal technicality; thus, enthusiastic DIYs will find it enjoyable.
- Assemble your tools – it is essential to put all your necessary tools together before settling for the installation. As highlighted above, the tools include a drill, a hammer, a nail, and a tape measure. You may require to have your protective gear such as the gloves for safety precaution as a plus.
- Get the Measurements – once you have assembled all your tools, it’s time to settle on the installation. Maintain accuracy when taking the measurements. Begin by measuring the gauge of the smoker thermometer to get its size. These measurements will facilitate you when you punch the guide. Make sure to align and transfer accurate measurements to ensure you have a fit between the gauge and the drilled space.
- Punch a guide – use the hammer and the nail to punch a guide over the hood where the thermometer is to be installed. This guide will assist you drill the right hole size to install.
- Drill a hole – follow the guide punched on your grill and drill a hole to install the gauge. This is where your drill tool comes handy; it makes drilling a hole through your metallic grill easier and faster.
- Install your thermometer gauge – once you have drilled the hole, it is time to fix the gauge in place. Begin by removing the wing-nut on the thread of the gauge and guide the thread through the hole. When it is well threaded, tighten the thermometer gauge in place using the wing-nut from the inside. Align the thermometer for easier and accurate readings taking when grilling food.
- Run a pilot test – this is an optional step. You can heat up the grill and observe for any temperature changes on your thermometer. When you are convinced it is perfectly working, it is time to enjoy your grilling!
Final Words
The installation process is as easy as explained above. You can execute it in a matter of time and improve the quality of your grilling. Gauging the pros of having a thermometer on your grill, it is definitely a must-have add on the gadget for better grilling.